+44 7727 978782
ua
Submit Request

Everything You Need To Know About Micro-Markup Schema.ORG

Everything You Need To Know About Micro-Markup Schema.ORG

In this article, I want to tell you everything about micro-markup schema.org. We could start talking directly in the introduction about its importance in SEO promotion of the site, or we can just insert a meme with Agutin. I chose the second variant ?

WHAT IS MICRO-MARKUP?

To put it briefly and clearly, micro-markup is a single scheme for semantic HTML markup, which has been recognized by such search engines as:

  • Google;
  • Yandex;
  • Bing;
  • Yahoo!

It consists entirely of <span>, <div> tags, and the content in them.

With the help of micro-markup, you can single out individual fragments of the relevant content, what, in its turn, ensures the correct recognition of the information by search engines. In addition, it makes such a snippet more attractive in the eyes of the user.

WHAT IS SCHEMA.ORG?

Schema.org is one of the most popular dictionaries in the world, which, like other dictionaries, consists of properties and sets of classes.

Schema is used to form an extended snippet and increase the relevance of the content.

As an example, this markup describes the page with the movie “The Lord of the Rings: The Fellowship of the Ring”:

In this snippet, breadcrumbs are displayed at the top, and information about the director, the translation of the film, its quality, which lists it is included in, as well as links to the next part of the film and the actors is displayed at the bottom. Is it convenient? Definitely yes.

PRACTICE

In order to mark up the data yourself, you need to visit the official website schema.org, go to the “Schemas” section, select the necessary entity, decide what properties we will specify and start, in fact, gather the code.

ENTITY TYPES

At the moment, the number of entities that Google supports exceeds 50. The most popular ones are:

It is impossible to pass by without mentioning three new types of entities:

  • HowTo — it is the best for use for pages with step-by-step instructions.
  • FAQ– it is good for pages with a question and an answer on a specific topic.
  • Q&A — it is used for pages where the questions are answered by the users themselves.

MICRO-MARKUP FAQ

For adequate display of this entity, the page shall meet the certain criteria:

  1. The content on the page should contain a list of questions and, accordingly, answers to them.
  2. The content that is marked up with this micro-markup shall be available for users on the home page.
  3. The content must be informative, without any advertising.
  4. And, of course, the content should not contain any hatred, materials with sexual content, propaganda of violence, etc. (anything that Google does not accept)

The FAQ markup works well with such markups as Product and LocalBusiness.

HOWTO MICRO-MARKUP

And again, we shall start with the requirements:

  1. Each stage of actions must include all the content of a similar stage from the page (one stage from the page cannot be divided into several stages).
  2. No advertising.

The text of the stage itself is not clickable, however, by embedding of the links in the structured data, an anchor can be attached to each step, which will lead to the page with this subsection.

Example of micro-markup in the search results:

(By the way, the tips in the image are perfectly suitable for the question “How to get to fall in love a search engine with”)

Q&A MICRO-MARKUP

The difference between this entity and the FAQ micro-markup is that it is intended for a single question and multiple answers to it by users, while in the FAQ, the questions and the answers are already written in the content itself.

This is one of the main requirements for this markup, but you should not forget about the standard requirements (absence of advertising content and absence of prohibited themes).

Thus, this micro-markup shows itself the best on the pages of forums and technical support.

Do not forget that when using the above mentioned entities, each user can find the answer to his or her question without visiting your site.

SYNTAX

For markup Schema.org the following syntaxes can be used:

  • JSON-LD;
  • microformats;
  • microdata;

Microformats are a limited and outdated syntax, thus, we will not consider it, as well as RDFa, which is rarely used anywhere (usually in Yandex).

MICRODATA

This syntax is used quite often, its implementation on the page is a time-consuming process due to the fact that it must be written manually.

This syntax consists of content, properties, and attributes, each of which has its own tags:

  • itemscope – describes each block, allows you to describe information at the entity level;
  • itemtype – required to specify the entity type;
  • itemprop – it is used to specify additional properties.

Example of markup:

JSON-LD

It should be at once noted that this markup is preferred for the Google search engine.

Here’s what it looks like in its basic form:

After inserting the micro-markup code into the framework, which consists of the same values, properties, and entities, we will get the following code:

WHAT IS THE EASIEST WAY TO MAKE JSON-LD MARKUP?

Of course, you can do the markup manually, but you will quickly give up this idea after learning that there are generators for JSON-LD.

Here are several of the most popular ones:

  • com – a paid tool with a trial period of 14 days, it supports all entities Schema.org;
  • com – a free service that supports 6 entities (Local Business, Website, Person, Organization, Product, Event);
  • com — it is also a free service that supports 13 entities (in addition to creation of markup, this platform has a number of useful tools, I advise you to have a look at it).

MARKUP VALIDATION

If you create markup using a generator or manually, you should always check its validity before loading the code. Validators from search engines can help you with this:

  • Extended data check from Google
  • The micro markup validator from Yandex

INSERT THE MICRO MARKUP ON THE PAGE

After we have checked the code for validation, and there are no problems with it, we insert it on the required page between the <head></head> tag.

IMPLEMENTING MICRO MARKUP WITHOUT USING CODE

If you don’t want to spend a lot of time selecting, writing, and implementing micro-markup, you can use a tool from Google called Data Marker.

Using this option you will need to:

  1. Click on the link at the top, select or confirm your resource in Google Search Console.
  2. Indicate the URL of a similar page on the site, for example, the product page in the online store.
  3. Select the type of information and click on the “Start selection” button.
  4. After that, the page you selected will load. On the right, you will see the list of properties available for the entity you selected.
  5. Highlight the desired line and select the desired property in the appeared window. Thus, mark up all the necessary elements and click the button “Done”.
  6. After that, you will be asked to select a group of similar pages that the system has created or create your own. After that, click on the “Create a group of pages” button.
  7. As a result, you will be asked to check the correctness of the markup. Click “Publish”, and if you have any errors, correct them.

INSTEAD OF CONCLUSIONS

Micro-markup Schema.org is a cool and necessary tool that is not so difficult to implement, in particular, using special tools and services. Thus, be sure to insert it on your site if you still don’t have it.

I want to thank you for reading my article to the end, and I hope that it was useful for you.

4 most popular SEO problems with Shopify and their solutions

4 most popular SEO problems with Shopify and their solutions

Shopify is a widely used e-commerce platform that makes it easier for businesses to sell their products online. The easy-to-use CMS made the platform particularly profitable for small retailers during the pandemic, allowing them to recover about 94% of the profits that could have simply been lost due to quarantine restrictions.

As with any new website, a new Shopify store will require a lot of effort on the part of its webmaster to provide the necessary visibility for users to find the site, let alone convert users to customers. And, as with any other CMS, there are several SEO hurdles that store owners need to eliminate in order for their website to effectively find its audience.

LIMITED URL STRUCTURE

Shopify CMS allows you to divide product lists into two main categories – products and collections, along with more general posts, pages and blogs. Creating a new product on Shopify allows you to list individual items that you have for sale, while collections give you the ability to combine your disparate products and sort them into categories that are easy to find.

The problem most people face is that Shopify also provides a pre-defined hierarchical structure with limited customization options. The /product and /collection subfolders must be included in the URL of every new product or collection you upload.

Even though this is a huge bone of contention among users, Shopify has not yet solved this problem, and there is currently no solution. As a result, you will need to be extremely careful with the URL label (the only part that can be customized). Make sure you use the right keywords in the title, and classify your posts intelligently so that your products are best found.

AUTOMATICALLY GENERATED REPEATING CONTENT

Another unpleasant problem with classification occurs when people add a particular product to a collection. This is because, although there is already an URL for the product page, linking the product to a collection automatically creates an additional URL for it in the same collection.

Shopify automatically treats the collection URL-address as canonical for internal links, rather than as a product URL-address, which can make the task much more difficult when it comes to ensuring that the correct pages are indexed.

However, in this case, Shopify allowed the fixes, although this is due to editing the code in the back-end of your store’s theme. Following these instructions, the collection pages of your Shopify site will only point internal links to the canonical / product / URLs.

NO REDIRECTION AT THE END OF THE SLASH

Another problem with duplicating Shopify content is related to the trailing slash at the end of the URL used to indicate the catalog. Google treats URLs with and without slashes as unique pages. By default, Shopify automatically terminates an URL without a slash, but variations of the same URL with a slash at the end are available to both users and search engines. This can usually be avoided by applying a trailing slash redirect to the entire site via the website’s htaccess file, but Shopify does not allow access to the htaccess file.

Instead, Shopify recommends that SEO specialists use canonical tags to tell Google which version of each page is preferred for indexing. This is the only fix available at the moment, but it is far from perfect and often leads to problems with data attribution in Google Analytics and other tracking programs.

NO CONTROL OVER THE FILE ROBOTS.TXT ON THE SITE

In addition to forcing users to create duplicate versions of pages against their will, Shopify also prevents webmasters from manually editing the file robots.txt of the store. Apparently, Shopify sees this as a privilege, solving unpleasant technical SEO issues on your behalf. However, when products run out or collections disappear, you can’t use either noindex or nofollow for the remaining redundant pages.

In this case, you can edit the theme of your store by adding robot meta tags to the <head> section of each corresponding page. Shopify has created a step-by-step guide on how to hide duplicate pages from the search here.

How To Recover Temporarily-Banned Instagram Account

How To Recover Temporarily-Banned Instagram Account

If you’re reading this, you’ve probably already experienced a problem of Instagram banning accounts. But there’s nothing to worry about, because a lot of people go through this ban on Instagram and wander how to unblock Instagram account.

Essentially, social media sites like Instagram adhere to strict user policy terms to ensure that every user continues to enjoy themselves and doesn’t worry about unpleasant incidents or inappropriate content.

However, it may happen that your seemingly normal actions raise a red flag, and the next moment you find out that Instagram temporarily locked for suspicious activity.

In this article, we will try to tell you everything you need to know about Instagram banning accounts and will answer your questions: “Why did Instagram disabled my account?”, “How can I unblock my Instagram account?” and “How do I stop getting banned from Instagram?”.

 LET’S GET STRAIGHT TO THE POINT.

How do I know if I’ve been banned from Instagram? Quite simple. If you’re reading a message that looks something like the one shown in the following screenshot, consider that your account is blocked.

You will also know it when you find out that you can’t perform certain actions. For example, if you upload a photo, like, subscribe or comment, you will most likely be banned.

WHY DID MY INSTAGRAM ACCOUNT GET BANNED?

Here are some of the reasons why your Instagram account may be temporarily blocked.

  1. Mass subscription or unsubscription.

It is likely that if you subscribe to people, they will subscribe in response. However, mass subscribing and unsubscribing of people in a short period of time can get you into trouble. The reason is that this behavior makes you look like a regular Instagram bot, because of which the platform blocks your account.

  1. Put likes or dislikes too fast

On Instagram, it is quite normal to like 3 to 5 photos per minute, but liking a large number of photos (about 100) per minute makes your account suspicious. Since such activity can only be associated with a bot, Instagram will probably ban you.

  1. Use of third-party applications.

There are many third-party apps that offer a variety of great deals to improve the status of your Instagram account. These apps can help you get more followers by automatically commenting on other people’s photos to get more attention or followers.

But all this has serious consequences. Use of third party applications for all of these actions in the Instagram means that you’re following a specific pattern (e.g., bot), and because the Instagram algorithm is smart enough detecting these steps, your account will likely be blocked.

  1. Commenting too fast

Commenting on photos is a good way to attract more attention to your account. However, commenting on too many photos too quickly or using a third-party app to do so may result in your Instagram temporarily locked for suspicious activity.

  1. Posting similar comments.

Another reason for Instagram banning accounts is if you repeatedly post similar or identical comments to people’s photos. There may also be problems with a third-party app here, as they post general comments on people’s photos that are similar to each other and mostly unrelated to the photos.

HOW LONG DO INSTAGRAM BANS LAST?

If this is your first time experiencing a temporary ban on Instagram, you may be wondering how long it will last. Well, it depends on how many times you were banned and what actions led to the ban. Usually, the duration of a temporary ban on Instagram is from a few hours to 24-48 hours.

The duration of the ban also depends on your subsequent actions. If you continue to commit the wrong actions, the ban may be extended. So if this is the first time you get a temporary ban, you’d better start behaving well.

CAN I GET A PERMANENT BAN ON INSTAGRAM?

The risk of being permanently blocked depends on your activity after a temporary ban. If you continue to send spam, massively subscribe and unsubscribe, as well as post too many random comments on people’s photos, your Instagram account can be blocked permanently.

HOW TO GET UNBLOCKED ON INSTAGRAM?

Here are a few things you can do to recover a banned Instagram account and continue your activities as before.

  1. Let Instagram know about your ban.

If you have mistakenly done something that has led to the temporary blocking of your Instagram account, you can report your case to the administration by clicking the “Report us” or “Report” button.

  1. Stop your activities for 2 days and resume from the 3rd one.

As a precautionary measure, you should stop all activities for at least 2 days. I mean stop liking, commenting, subscribing or unsubscribing. Although you can continue to scroll the feed on Instagram.

On day 3, resume using Instagram with the usual actions, avoiding anything that might make you look like a bot. Only like and comment on a couple of photos a day, and even try uploading a photo to check if everything is OK.

HOW DO I STOP GETTING BANNED FROM INSTAGRAM?

In this section of the article you will read about a few things you can do to avoid and find out how to remove action blocked on instagram.

  1. Remove third-party apps.

As I mentioned above, third-party apps that offer to promote your Instagram account actually do more harm than good. So as a first step, you should immediately stop using third-party apps if you are using them.

In fact, if you want to attract real traffic and real users to your account, it’s better to promote it manually.

  1. Linking Instagram to other social networks.

We recommend linking your Instagram account to another social media account. If Instagram considers your account suspicious, linking to other social networks will make you more legitimate.

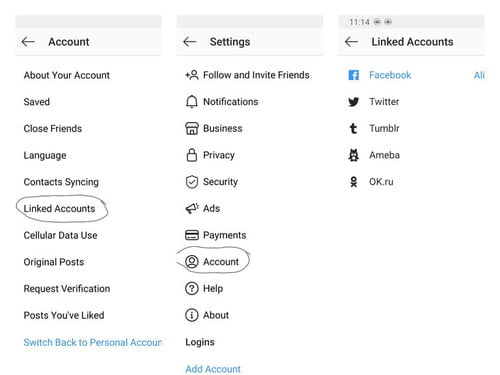
To link Instagram to other social networks, do the following:

  • Go to settings
  • Under “Settings”, select “Privacy and security” > “Linked accounts”.

  1. Fill out your Instagram profile.

The first thing that any social network checks for a suspicious account is a profile. The more complete the profile, the more authentic the user is considered. Take a look at your Instagram profile and fill in if there’s something missing.

  1. Behave yourself!

Last but not least, stop abusing the system or sending spam. Like, subscribe, and comment in an orderly manner with at least 10 seconds between your actions. This will distinguish you from a spammer or bot, and you can continue working with Instagram without the risk of being banned.

Best Time To Post On TikTok In 2021

Best Time To Post On TikTok In 2021

If you want to increase the number of subscribers in TikTok, you are probably wondering: “Does it matter how often you post on TikTok?” or “When is the best time to post on TikTok?” But finding the answer to this question is not so easy, given the fact that the platform is still developing.

TikTok now has a whopping 800 million active users worldwide — and the number is growing. Teenagers become instant stars, and trends in TikTok move at the speed of light. As a result, TikTok’s growth tactics are constantly changing and evolving.

Still, a little strategy is better than no strategy, right? Especially when you can help increase engagement and increase subscribers by sharing content at a time that is relevant to your audience. So, what time should you post to get more likes?  In this article, we will share with you the latest research on the best time to post on TikTok. You will also learn what TikTok profile analytics is and will receive answers to the following questions: “What do TikTok analytics mean?”, “How many followers do you need on TikTok to see your analytics?”, “How long does TikTok analytics take?” and “How do I update TikTok Analytics?”

WHAT ARE GLOBAL BEST TIMES TO POST ON TIKTOK IN 2021?

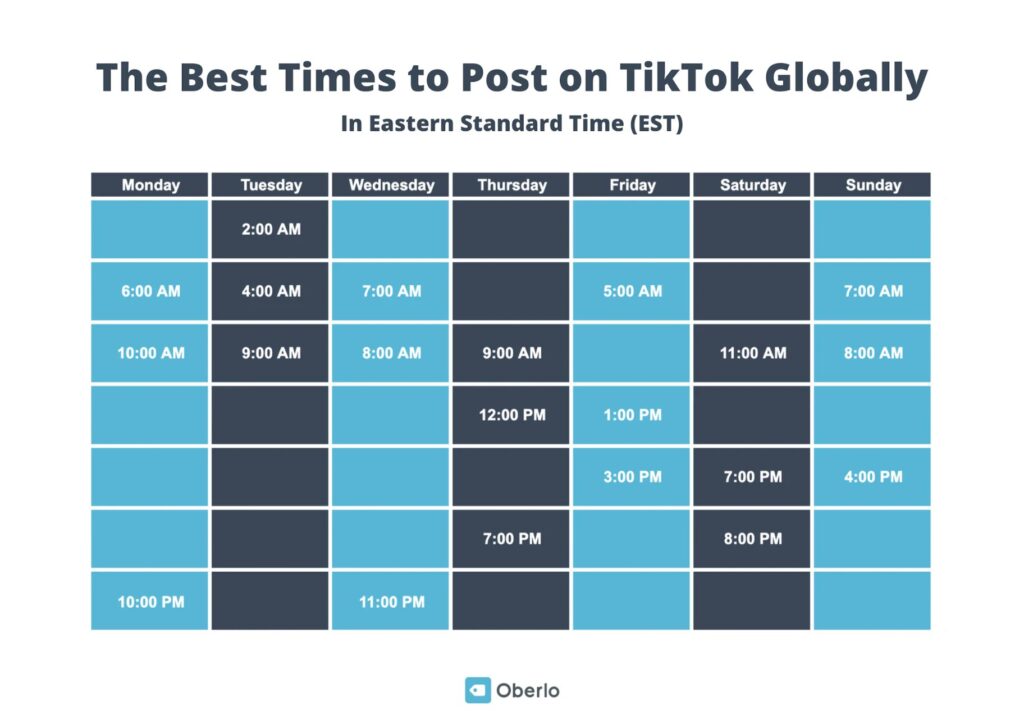
Overall, the best TikTok posting times are from 6 to 10 a.m. and 7 to 11 p.m. Eastern Standard Time (EST). Influencer Marketing Hub conducted a survey of more than 100,000 publications to answer the question: “When is the best time of day to post on TikTok?”

They found the TikTok times to post for every day of the week. Here are the best times to post on TikTok Eastern Standard Time  (EST):

  • Mon: 6.00 / 10.00 / 22.00
  • Tue: 2:00 / 4:00 / * 9:00
  • Wed: 7.00 / 8.00 / 11.00
  • Thu: 9.00 / * 12.00 / 19.00
  • Fri: * 5.00 / 13.00 / 15.00
  • Sat: 11.00 / 19.00 / 20.00
  • Sun: 7.00 / 8.00 / 16.00

(* Time marked with an asterisk indicates a particularly high level of engagement.)

The study found that the best time to post on TikTok was observed at 9 a.m. on Tuesday, 12 a.m. on Thursday, and 5 a.m. on Friday.

Here is a visual illustration to make it easier for you to understand when in the world it is prime time to post on TikTok in 2021:

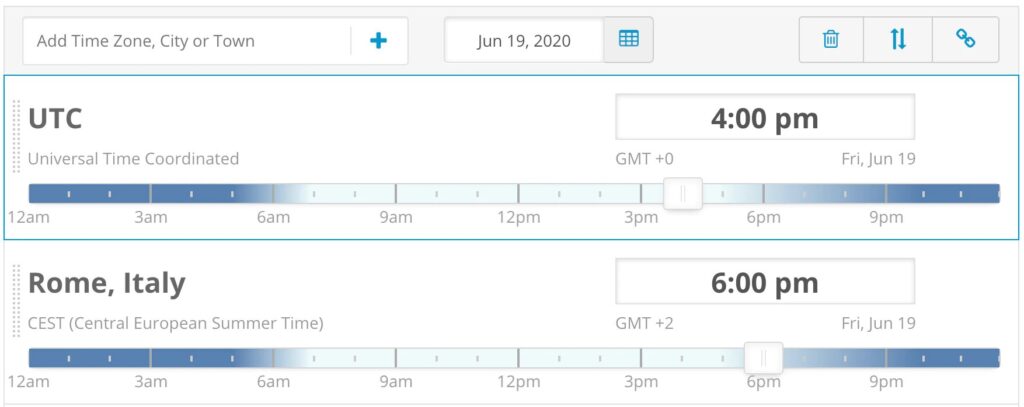
Remember that this time is Eastern Standard Time (EST). So, you will need to use the data conversion tool to determine the best time to post TikTok videos for your region. To do this, you can use free online tools like Savvy Time or The Time Zone Converter. But how do you know exactly where your audience is?

Good times to post on TikTok is, of course, a good thing. But in reality, every author, opinion leader or brand will have a slightly different best time to post a TikTok video. There is no universal solution. Why? All content makers and subscribers are different! The location of your target audience, interests, age and gender will also matter.

TikTok allows you to find a lot of information about your content and subscribers — where is this information? In TikTok analytics. Although this is not exactly accurate data, here is everything you need to determine the best time to post a video to TikTok. This information is displayed in your account analytics, including details about how to check when your followers are most active.

SO, WHAT DO TIKTOK ANALYTICS MEAN HOW TO CHECK MY TIKTOK ANALYTICS?

Step 1. Get a Pro Account to access TikTok Analytics

Before you can see your analytics, you need to upgrade to a TikTok Pro account — it only takes a minute.

How to get a pro account on TikTok ? Let’s take a look at how to get a TikTok Pro account, step by step:

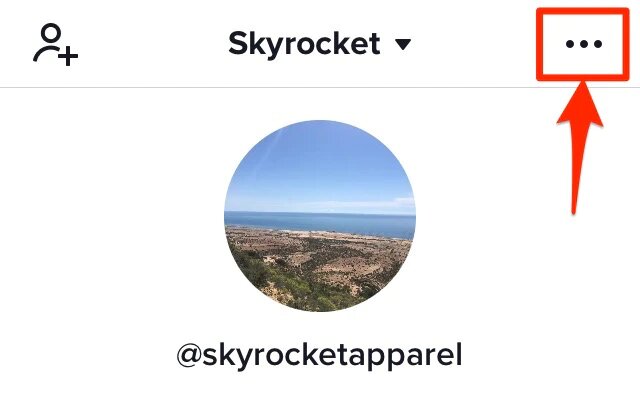
  • First, tap the three dots that represent the menu in the upper-right corner of your profile.
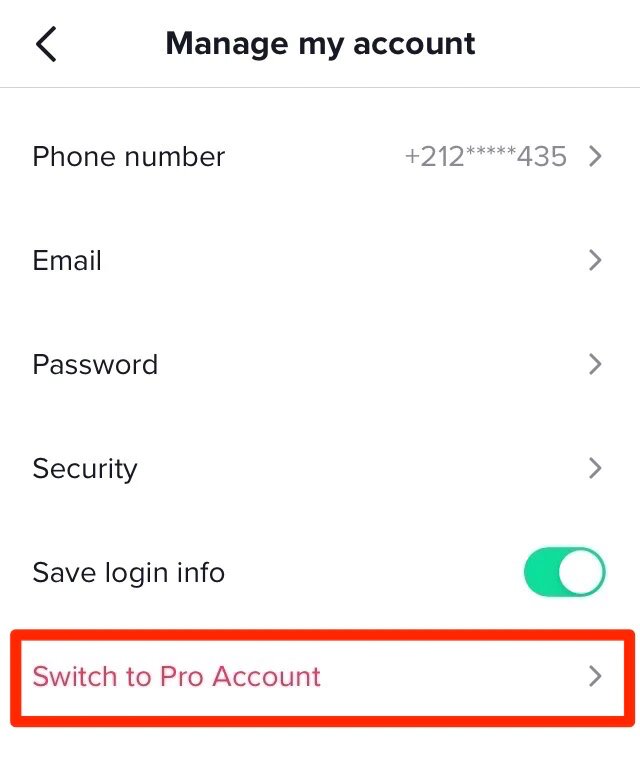
  • Then click “Manage Account”.
  • From here, click “Switch to Pro Account” to start the process.
  • Select your account type and follow the instructions to complete the process.

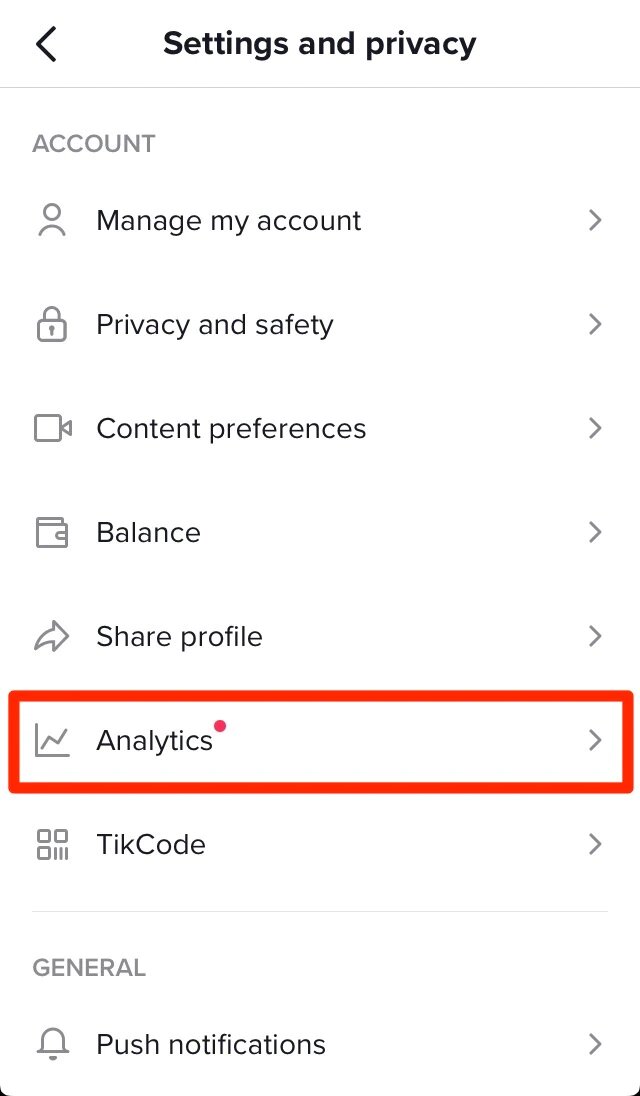
When you are done, you will return to your account menu and receive a notification that you have switched to your TikTok Pro account. At this stage, you will see a new menu item: Analytics!

Step 2. Get acquainted with TikTok Analytics

Before we continue, let’s get acquainted with the analytics tool. In the analytics section, you will find three tabs:

  • Overview: This tab provides a bird’s-eye view of your videos, followers and profiles.
  • Content: Here you can find metrics of your posts, such as views, likes, comments and average viewing time.
  • On this tab, you can find out about the growth in the number of subscribers, what content they interact with and where they are.

Step 3. Find out where your audience is located

The best TikTok post time mostly depends on where your audience is located. How to find your target audience?

Go to the Subscribers tab and scroll down to view the most popular territories. Here you can see how to find your niche audience and see where your subscribers live.

TIKTOK SUBSCRIBER ANALYTICS

Once you know where the majority of your subscribers are, you can use the best time to post on the TikTok mentioned above to predict when your audience is most likely to be online.

Don’t forget to convert the best time in the world to the time zone of your top territory!

Unfortunately, TikTok only provides the name of the country where your audience resides. This presents a problem if your audience is primarily in the US, as the country is located in multiple time zones.

For example, if you live in New York, you can assume that most of your audience lives on the east coast of America. However, you may have many subscribers in California. In this case, if you post at 7 a.m., probably most of your California followers will still be asleep! However, don’t worry.

If your audience mostly resides in the US or other countries with a large number of time zones, there are some things you can do to get around this problem. We’ll talk about this a little further.

Step 4. Find out how to find your audience online.

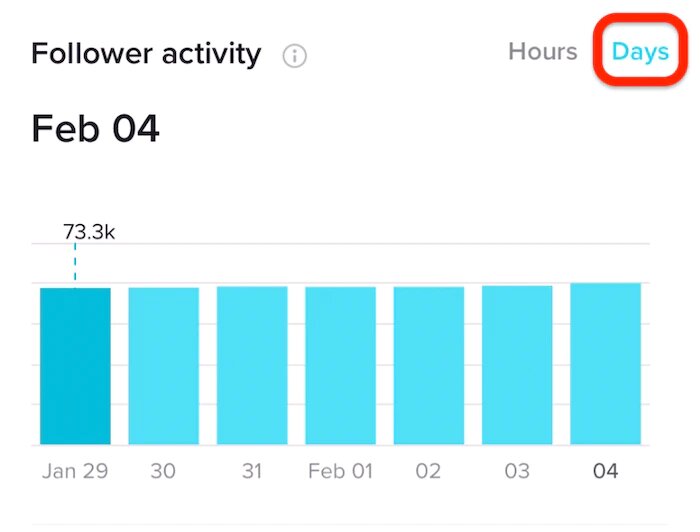
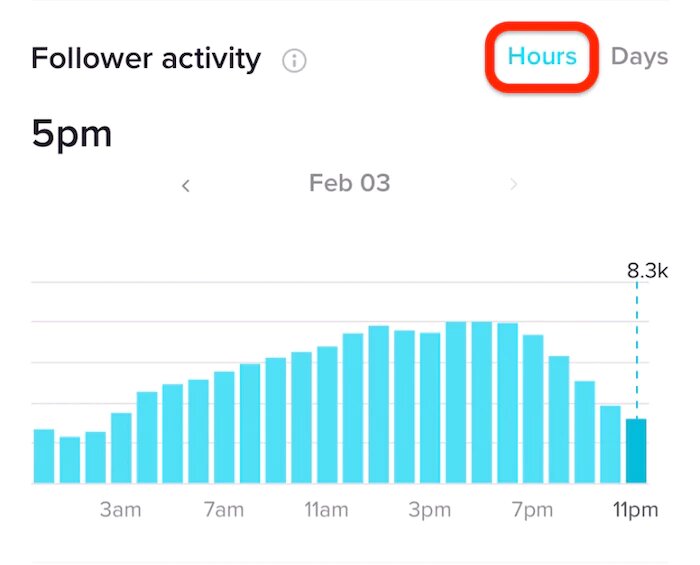
You can better understand when is the best time to post on tiktok today by identifying when your audience is most interested. To do this, go to the Subscribers tab and scroll down to see the activity of your subscribers.

Step 5. Convert the displayed time to your own time zone

All information in TikTok analytics is recorded in Coordinated Universal Time (UTC). You will need to convert the hours when your subscribers are most active to the time zones of your audience’s location.

Let’s see how to do this

For example, TikTok shows that the activity of your subscribers increases dramatically from 16:00 to 18:00 Coordinated Universal Time. If your audience mostly lives in Italy, you can use Savvy Time to find out that the best time to post on tiktok to go viral is from 18:00 to 21:00.

Step 6. Learn from your highly effective content

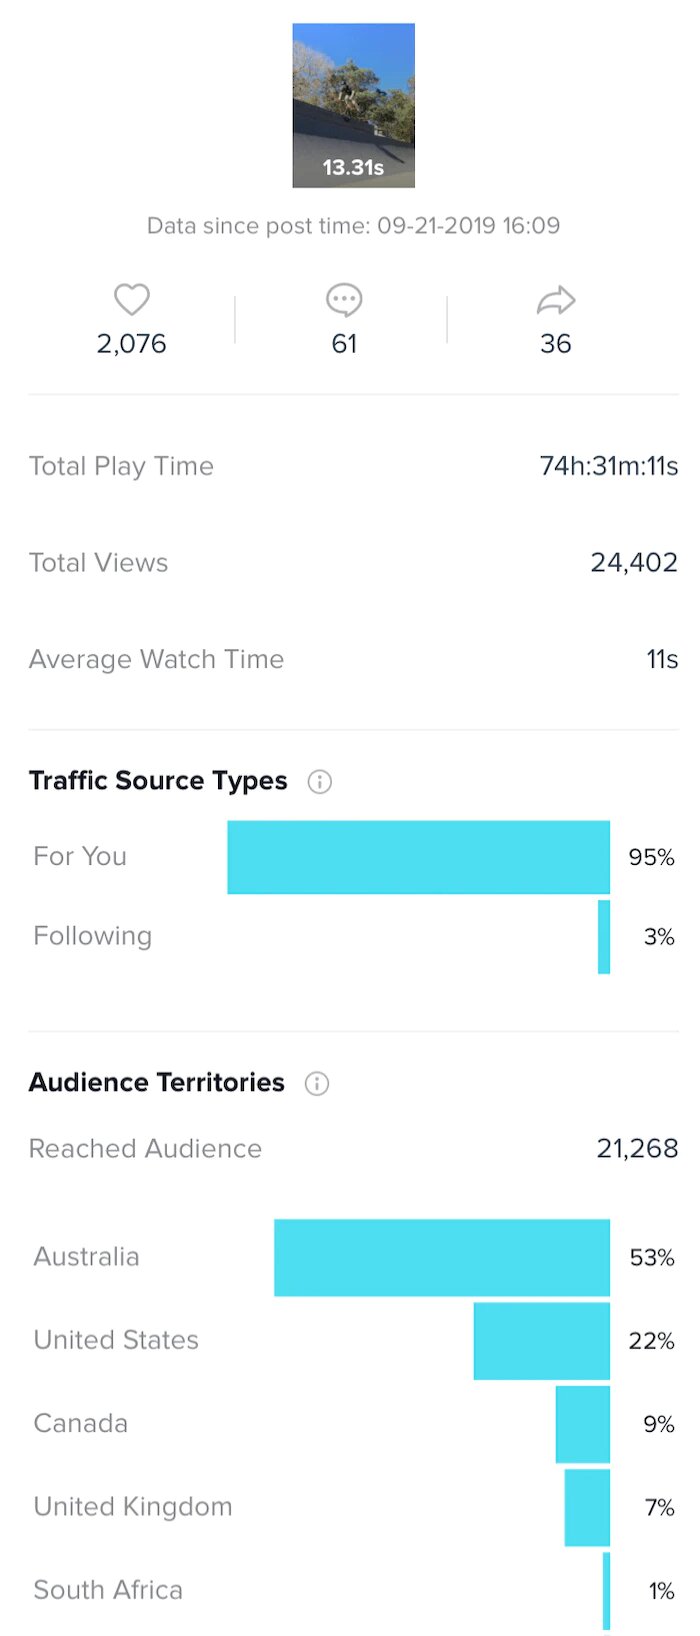
Now let’s take a look at your most effective content to determine the best time to post on TikTok. How do you measure effectiveness of content? To start, click “Content” at the top of the TikTok analytics page. Here you can see how your posts have worked and track content performance over the past seven days. Scroll down to see the most popular videos, then click on a post to see more information about it. How would you measure the performance of your content marketing? For each post, you can see how many views, likes, comments and reposts it has received. You will also find out the average viewing time and the sources of views of the publication.

TIKTOK CONTENT ANALYTICS

So, how can you use this information to determine the best time to post to TikTok?

When viewing the metrics for the most successful posts, check the date and time when you shared this post — they are located at the top of the page under the video thumbnail. The goal now is to try to establish a connection between the time and day you shared the post and the results you achieved.

Is there a pattern?

For example, if all of your most successful videos were posted on a Friday night, you know that this is one of the best moments to post on TikTok!

Remember that all data in TikTok is recorded in Coordinated Universal Time (UTC), so you will need to convert the time to your subscriber’s upper territory.

Step 7. Track the effectiveness of your content over time

Reliably spotting patterns in your TikTok analytics can be tricky. Any decision you make is bound to be a bit inaccurate and will require some assumptions. What’s more, the app only shows content from the last seven days and deletes analytics data after just 28 days. Feel free to contact us and our best SMM specialists will provide you with additional information.

Preparation of reports.

Although no one likes reports, but here they can really save the situation. It may take a little time, but the whole process is quite simple. All you have to do is create a Microsoft Excel or Google Sheet and enter the data for each of your messages.

Over time, this information can become very valuable. You can sort this information by views or territory and use it to find the best time to post on TikTok. You can also use this information to determine which type of content works best.

For example, you may notice that your comedy videos perform exceptionally well, while your dance videos get the least likes. In this case, you can reduce the number of dance clips and focus on creating more humorous videos to attract the attention of the audience.

Step 8: Explore other platforms

Do you have an active audience on another platform, such as Instagram or YouTube? Do you make similar content for the same target audience?

If so, you can use your other social media accounts to determine the best time to post to TikTok. Just go to your other accounts and take a look at the analytics.

Here’s a TikTok algorithm of the best time to post a video to maximize your audience engagement:

  1. Get a TikTok Pro account to access your content and subscriber analytics.
  2. Find out where your audience is located on the Subscribers tab.
  3. Convert the best time to post on TikTok (listed above in EST) to your audience’s time zone.
  4. Find out when your subscribers are most interested on the Subscribers tab. Then convert the time specified in TikTok (in UTC format) to your audience’s time zone.
  5. Take a look at the publication analytics on the Content tab. Is there some model of videos that work well when they are posted at a certain time?
  6. Track your video’s performance over time to identify trends that will tell you when it’s best to post on TikTok.
  7. If you have an engaged audience on another platform, such as Instagram or YouTube, check the analytics to see if they can tell you when your target audience is most active on social media.

Open->
to new

Start working with #UAATEAM

  • United States+1
  • Afghanistan (‫افغانستان‬‎)+93
  • Albania (Shqipëri)+355
  • Algeria (‫الجزائر‬‎)+213
  • American Samoa+1
  • Andorra+376
  • Angola+244
  • Anguilla+1
  • Antigua and Barbuda+1
  • Argentina+54
  • Armenia (Հայաստան)+374
  • Aruba+297
  • Australia+61
  • Austria (Österreich)+43
  • Azerbaijan (Azərbaycan)+994
  • Bahamas+1
  • Bahrain (‫البحرين‬‎)+973
  • Bangladesh (বাংলাদেশ)+880
  • Barbados+1
  • Belarus (Беларусь)+375
  • Belgium (België)+32
  • Belize+501
  • Benin (Bénin)+229
  • Bermuda+1
  • Bhutan (འབྲུག)+975
  • Bolivia+591
  • Bosnia and Herzegovina (Босна и Херцеговина)+387
  • Botswana+267
  • Brazil (Brasil)+55
  • British Indian Ocean Territory+246
  • British Virgin Islands+1
  • Brunei+673
  • Bulgaria (България)+359
  • Burkina Faso+226
  • Burundi (Uburundi)+257
  • Cambodia (កម្ពុជា)+855
  • Cameroon (Cameroun)+237
  • Canada+1
  • Cape Verde (Kabu Verdi)+238
  • Caribbean Netherlands+599
  • Cayman Islands+1
  • Central African Republic (République centrafricaine)+236
  • Chad (Tchad)+235
  • Chile+56
  • China (中国)+86
  • Christmas Island+61
  • Cocos (Keeling) Islands+61
  • Colombia+57
  • Comoros (‫جزر القمر‬‎)+269
  • Congo (DRC) (Jamhuri ya Kidemokrasia ya Kongo)+243
  • Congo (Republic) (Congo-Brazzaville)+242
  • Cook Islands+682
  • Costa Rica+506
  • Côte d’Ivoire+225
  • Croatia (Hrvatska)+385
  • Cuba+53
  • Curaçao+599
  • Cyprus (Κύπρος)+357
  • Czech Republic (Česká republika)+420
  • Denmark (Danmark)+45
  • Djibouti+253
  • Dominica+1
  • Dominican Republic (República Dominicana)+1
  • Ecuador+593
  • Egypt (‫مصر‬‎)+20
  • El Salvador+503
  • Equatorial Guinea (Guinea Ecuatorial)+240
  • Eritrea+291
  • Estonia (Eesti)+372
  • Ethiopia+251
  • Falkland Islands (Islas Malvinas)+500
  • Faroe Islands (Føroyar)+298
  • Fiji+679
  • Finland (Suomi)+358
  • France+33
  • French Guiana (Guyane française)+594
  • French Polynesia (Polynésie française)+689
  • Gabon+241
  • Gambia+220
  • Georgia (საქართველო)+995
  • Germany (Deutschland)+49
  • Ghana (Gaana)+233
  • Gibraltar+350
  • Greece (Ελλάδα)+30
  • Greenland (Kalaallit Nunaat)+299
  • Grenada+1
  • Guadeloupe+590
  • Guam+1
  • Guatemala+502
  • Guernsey+44
  • Guinea (Guinée)+224
  • Guinea-Bissau (Guiné Bissau)+245
  • Guyana+592
  • Haiti+509
  • Honduras+504
  • Hong Kong (香港)+852
  • Hungary (Magyarország)+36
  • Iceland (Ísland)+354
  • India (भारत)+91
  • Indonesia+62
  • Iran (‫ایران‬‎)+98
  • Iraq (‫العراق‬‎)+964
  • Ireland+353
  • Isle of Man+44
  • Israel (‫ישראל‬‎)+972
  • Italy (Italia)+39
  • Jamaica+1
  • Japan (日本)+81
  • Jersey+44
  • Jordan (‫الأردن‬‎)+962
  • Kazakhstan (Казахстан)+7
  • Kenya+254
  • Kiribati+686
  • Kosovo+383
  • Kuwait (‫الكويت‬‎)+965
  • Kyrgyzstan (Кыргызстан)+996
  • Laos (ລາວ)+856
  • Latvia (Latvija)+371
  • Lebanon (‫لبنان‬‎)+961
  • Lesotho+266
  • Liberia+231
  • Libya (‫ليبيا‬‎)+218
  • Liechtenstein+423
  • Lithuania (Lietuva)+370
  • Luxembourg+352
  • Macau (澳門)+853
  • Macedonia (FYROM) (Македонија)+389
  • Madagascar (Madagasikara)+261
  • Malawi+265
  • Malaysia+60
  • Maldives+960
  • Mali+223
  • Malta+356
  • Marshall Islands+692
  • Martinique+596
  • Mauritania (‫موريتانيا‬‎)+222
  • Mauritius (Moris)+230
  • Mayotte+262
  • Mexico (México)+52
  • Micronesia+691
  • Moldova (Republica Moldova)+373
  • Monaco+377
  • Mongolia (Монгол)+976
  • Montenegro (Crna Gora)+382
  • Montserrat+1
  • Morocco (‫المغرب‬‎)+212
  • Mozambique (Moçambique)+258
  • Myanmar (Burma) (မြန်မာ)+95
  • Namibia (Namibië)+264
  • Nauru+674
  • Nepal (नेपाल)+977
  • Netherlands (Nederland)+31
  • New Caledonia (Nouvelle-Calédonie)+687
  • New Zealand+64
  • Nicaragua+505
  • Niger (Nijar)+227
  • Nigeria+234
  • Niue+683
  • Norfolk Island+672
  • North Korea (조선 민주주의 인민 공화국)+850
  • Northern Mariana Islands+1
  • Norway (Norge)+47
  • Oman (‫عُمان‬‎)+968
  • Pakistan (‫پاکستان‬‎)+92
  • Palau+680
  • Palestine (‫فلسطين‬‎)+970
  • Panama (Panamá)+507
  • Papua New Guinea+675
  • Paraguay+595
  • Peru (Perú)+51
  • Philippines+63
  • Poland (Polska)+48
  • Portugal+351
  • Puerto Rico+1
  • Qatar (‫قطر‬‎)+974
  • Réunion (La Réunion)+262
  • Romania (România)+40
  • Russia (Россия)+7
  • Rwanda+250
  • Saint Barthélemy+590
  • Saint Helena+290
  • Saint Kitts and Nevis+1
  • Saint Lucia+1
  • Saint Martin (Saint-Martin (partie française))+590
  • Saint Pierre and Miquelon (Saint-Pierre-et-Miquelon)+508
  • Saint Vincent and the Grenadines+1
  • Samoa+685
  • San Marino+378
  • São Tomé and Príncipe (São Tomé e Príncipe)+239
  • Saudi Arabia (‫المملكة العربية السعودية‬‎)+966
  • Senegal (Sénégal)+221
  • Serbia (Србија)+381
  • Seychelles+248
  • Sierra Leone+232
  • Singapore+65
  • Sint Maarten+1
  • Slovakia (Slovensko)+421
  • Slovenia (Slovenija)+386
  • Solomon Islands+677
  • Somalia (Soomaaliya)+252
  • South Africa+27
  • South Korea (대한민국)+82
  • South Sudan (‫جنوب السودان‬‎)+211
  • Spain (España)+34
  • Sri Lanka (ශ්‍රී ලංකාව)+94
  • Sudan (‫السودان‬‎)+249
  • Suriname+597
  • Svalbard and Jan Mayen+47
  • Swaziland+268
  • Sweden (Sverige)+46
  • Switzerland (Schweiz)+41
  • Syria (‫سوريا‬‎)+963
  • Taiwan (台灣)+886
  • Tajikistan+992
  • Tanzania+255
  • Thailand (ไทย)+66
  • Timor-Leste+670
  • Togo+228
  • Tokelau+690
  • Tonga+676
  • Trinidad and Tobago+1
  • Tunisia (‫تونس‬‎)+216
  • Turkey (Türkiye)+90
  • Turkmenistan+993
  • Turks and Caicos Islands+1
  • Tuvalu+688
  • U.S. Virgin Islands+1
  • Uganda+256
  • Ukraine (Україна)+380
  • United Arab Emirates (‫الإمارات العربية المتحدة‬‎)+971
  • United Kingdom+44
  • United States+1
  • Uruguay+598
  • Uzbekistan (Oʻzbekiston)+998
  • Vanuatu+678
  • Vatican City (Città del Vaticano)+39
  • Venezuela+58
  • Vietnam (Việt Nam)+84
  • Wallis and Futuna (Wallis-et-Futuna)+681
  • Western Sahara (‫الصحراء الغربية‬‎)+212
  • Yemen (‫اليمن‬‎)+967
  • Zambia+260
  • Zimbabwe+263
  • Åland Islands+358
Select a Service:
Please fill in all required form fields