+44 7445 523468
ua
Submit Request

How to optimize your YouTube channel?

How to optimize your YouTube channel?

How to ensure that your YouTube video can be seen by thousands of interested users, and you get a thumbs up and new subscribers? In addition to good and suitable content, you need SEO optimization of the YouTube channel in general and of each video in particular. Read below how to do it and what you need for this.

THE FIRST STEP: COLLECTION OF THE SEMANTIC CORE

For people who are far from digital, it sounds incomprehensible. In fact, everything is simple: a semantic core is the words and phrases that characterize your product or service. For example, gift wrapping / website development / writing texts for Instagram pages.

This phrase will be the basis of the semantic core. Then it shall be added with other phrases and words that reveal the essence of the service or the product and their competitive advantages. And they correspond to the users’ search queries in the search engine.

Example: website development – website development in Ukraine – website development for $ 500 — website development on WordPress – website development for small businesses.

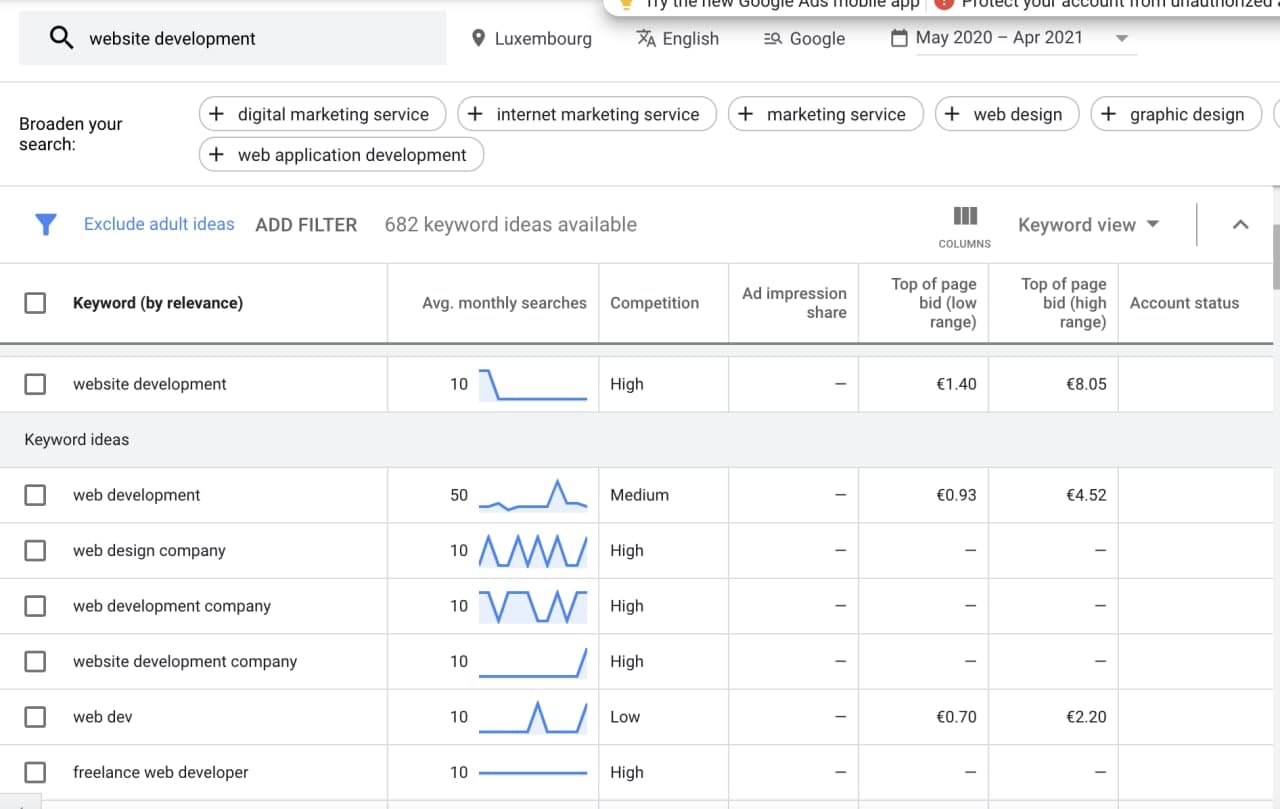
With SEO optimization of YouTube videos, the principle is the same. Only the base phrase will be the video theme. You can collect queries using a variety of tools, such as Semrush, Google Keywords Planner, Yandex Wordstat, and vidIQ.

You can also collect semantics using Google recommendations. When you enter a key query in Google, hints appear at the bottom of the page, where you can also find several suitable keywords.

Another important point is optimization of the video title on YouTube. This means that you need to enter the main keyword or phrase in the title of the video in order people will be able to find it on the platform much easier.

Examples: website development on WordPress for beginners / the main mistakes of beginners when developing a website on WordPress / how to make a website on WordPress in 24 hours.

You shall take into account the fact that all queries are divided into three groups: high-frequency, medium – frequency, and low-frequency queries. The first ones are the queries that are searched by the largest number of people. And as a rule, it is the most difficult to break through with a new video exactly in this niche. Therefore, it is better to add keywords from the second and the third groups.

You can use Wordstat program to determine which key phrases are high -, medium -, and low-frequency queries. It indicates the number of people who search for the words or phrases for each specific query.

THE SECOND STEP: PREPARING THE SCENARIO

Before optimizing a video on YouTube, you need to write in details its scenario. You must clearly understand what you are going to talk about. Then we add keywords and phrases to the speech. Now the search robots have leveled up their recognition skills. They process not only the information written under the video, but also what you say.

And when a person searches for information using a key query in a search engine, it will get a link to your video with timing. But there is one condition: all the key phrases must be pronounced clearly and distinctly in the video.

THE THIRD STEP: WRITING OF THE CORRECT DESCRIPTION FOR THE VIDEO

For “Description”, we shall write a unique text and add tags to the video. They are also used for quickly search for videos on YouTube based on key user’s queries. How to choose tags for a video on YouTube?

Take into account the key queries from the previously collected semantic core. The tag field allows to enter 500 characters. It should be filled “to the brim”. Choose only those tags that correspond to the theme of the video and the information voiced in it.

THE FOURTH STEP: LOOK FOR THE CORRESPONDING TAGS OF COMPETITORS

Another trick in video promotion that you need to know: how to view the tags of someone else’s video on YouTube. Knowing this method, you can quickly bring the video in the “Recommended” section.

To view someone else’s tags, you need the vidIQ plugin. It is installed in the browser. After installation, go through all procedures of registration and you will be able to see all the tags under someone else’s videos.

Also in this service, you can view detailed statistics of all your own and other people’s channels, compare your channel with competitors and, as already mentioned earlier, choose keywords for your videos.

THE FIFTH STEP: CHECK THE OPTIMIZATION USING THE CHECKLIST AND UPLOAD THE VIDEO

Before uploading the video to the channel, we recommend to check if you did everything correctly for the video optimization on YouTube using the checklist:

  1. The title of the video consisting of 20 to 70 characters, which contains the main keyword or phrase;
  2. The icon with high resolution is clear, with a readable phrase;
  3. Tags for key queries are added, and the field allowing to enter 500 characters is completely filled in;
  4. In the “Tips” section, the links to other videos posted on the channel that are similar in topic have been added;
  5. At the end of the video there is a final splash screen, which contains an icon with a call to subscribe to the channel and the links to two videos – the newest one and to the video that reveals better the essence voiced in the current video;
  6. You also added a new video to the playlist that corresponds to the theme of the video.

After uploading the video, prepare a comment and make sure that it is the first. The comment may contain useful information for viewers, which will also collect likes and comments.

Also, after the video is released on YouTube, you need to post links to it in all social networks – Instagram, Facebook, Twitter, VK, in order to increase the number of views.

Now you know exactly how properly to optimize a video on YouTube so that it harvests views and likes. Good luck!

Everything You Need To Know About Micro-Markup Schema.ORG

Everything You Need To Know About Micro-Markup Schema.ORG

In this article, I want to tell you everything about micro-markup schema.org. We could start talking directly in the introduction about its importance in SEO promotion of the site, or we can just insert a meme with Agutin. I chose the second variant ?

WHAT IS MICRO-MARKUP?

To put it briefly and clearly, micro-markup is a single scheme for semantic HTML markup, which has been recognized by such search engines as:

  • Google;
  • Yandex;
  • Bing;
  • Yahoo!

It consists entirely of <span>, <div> tags, and the content in them.

With the help of micro-markup, you can single out individual fragments of the relevant content, what, in its turn, ensures the correct recognition of the information by search engines. In addition, it makes such a snippet more attractive in the eyes of the user.

WHAT IS SCHEMA.ORG?

Schema.org is one of the most popular dictionaries in the world, which, like other dictionaries, consists of properties and sets of classes.

Schema is used to form an extended snippet and increase the relevance of the content.

As an example, this markup describes the page with the movie “The Lord of the Rings: The Fellowship of the Ring”:

In this snippet, breadcrumbs are displayed at the top, and information about the director, the translation of the film, its quality, which lists it is included in, as well as links to the next part of the film and the actors is displayed at the bottom. Is it convenient? Definitely yes.

PRACTICE

In order to mark up the data yourself, you need to visit the official website schema.org, go to the “Schemas” section, select the necessary entity, decide what properties we will specify and start, in fact, gather the code.

ENTITY TYPES

At the moment, the number of entities that Google supports exceeds 50. The most popular ones are:

It is impossible to pass by without mentioning three new types of entities:

  • HowTo — it is the best for use for pages with step-by-step instructions.
  • FAQ– it is good for pages with a question and an answer on a specific topic.
  • Q&A — it is used for pages where the questions are answered by the users themselves.

MICRO-MARKUP FAQ

For adequate display of this entity, the page shall meet the certain criteria:

  1. The content on the page should contain a list of questions and, accordingly, answers to them.
  2. The content that is marked up with this micro-markup shall be available for users on the home page.
  3. The content must be informative, without any advertising.
  4. And, of course, the content should not contain any hatred, materials with sexual content, propaganda of violence, etc. (anything that Google does not accept)

The FAQ markup works well with such markups as Product and LocalBusiness.

HOWTO MICRO-MARKUP

And again, we shall start with the requirements:

  1. Each stage of actions must include all the content of a similar stage from the page (one stage from the page cannot be divided into several stages).
  2. No advertising.

The text of the stage itself is not clickable, however, by embedding of the links in the structured data, an anchor can be attached to each step, which will lead to the page with this subsection.

Example of micro-markup in the search results:

(By the way, the tips in the image are perfectly suitable for the question “How to get to fall in love a search engine with”)

Q&A MICRO-MARKUP

The difference between this entity and the FAQ micro-markup is that it is intended for a single question and multiple answers to it by users, while in the FAQ, the questions and the answers are already written in the content itself.

This is one of the main requirements for this markup, but you should not forget about the standard requirements (absence of advertising content and absence of prohibited themes).

Thus, this micro-markup shows itself the best on the pages of forums and technical support.

Do not forget that when using the above mentioned entities, each user can find the answer to his or her question without visiting your site.

SYNTAX

For markup Schema.org the following syntaxes can be used:

  • JSON-LD;
  • microformats;
  • microdata;

Microformats are a limited and outdated syntax, thus, we will not consider it, as well as RDFa, which is rarely used anywhere (usually in Yandex).

MICRODATA

This syntax is used quite often, its implementation on the page is a time-consuming process due to the fact that it must be written manually.

This syntax consists of content, properties, and attributes, each of which has its own tags:

  • itemscope – describes each block, allows you to describe information at the entity level;
  • itemtype – required to specify the entity type;
  • itemprop – it is used to specify additional properties.

Example of markup:

JSON-LD

It should be at once noted that this markup is preferred for the Google search engine.

Here’s what it looks like in its basic form:

After inserting the micro-markup code into the framework, which consists of the same values, properties, and entities, we will get the following code:

WHAT IS THE EASIEST WAY TO MAKE JSON-LD MARKUP?

Of course, you can do the markup manually, but you will quickly give up this idea after learning that there are generators for JSON-LD.

Here are several of the most popular ones:

  • com – a paid tool with a trial period of 14 days, it supports all entities Schema.org;
  • com – a free service that supports 6 entities (Local Business, Website, Person, Organization, Product, Event);
  • com — it is also a free service that supports 13 entities (in addition to creation of markup, this platform has a number of useful tools, I advise you to have a look at it).

MARKUP VALIDATION

If you create markup using a generator or manually, you should always check its validity before loading the code. Validators from search engines can help you with this:

  • Extended data check from Google
  • The micro markup validator from Yandex

INSERT THE MICRO MARKUP ON THE PAGE

After we have checked the code for validation, and there are no problems with it, we insert it on the required page between the <head></head> tag.

IMPLEMENTING MICRO MARKUP WITHOUT USING CODE

If you don’t want to spend a lot of time selecting, writing, and implementing micro-markup, you can use a tool from Google called Data Marker.

Using this option you will need to:

  1. Click on the link at the top, select or confirm your resource in Google Search Console.
  2. Indicate the URL of a similar page on the site, for example, the product page in the online store.
  3. Select the type of information and click on the “Start selection” button.
  4. After that, the page you selected will load. On the right, you will see the list of properties available for the entity you selected.
  5. Highlight the desired line and select the desired property in the appeared window. Thus, mark up all the necessary elements and click the button “Done”.
  6. After that, you will be asked to select a group of similar pages that the system has created or create your own. After that, click on the “Create a group of pages” button.
  7. As a result, you will be asked to check the correctness of the markup. Click “Publish”, and if you have any errors, correct them.

INSTEAD OF CONCLUSIONS

Micro-markup Schema.org is a cool and necessary tool that is not so difficult to implement, in particular, using special tools and services. Thus, be sure to insert it on your site if you still don’t have it.

I want to thank you for reading my article to the end, and I hope that it was useful for you.

4 most popular SEO problems with Shopify and their solutions

4 most popular SEO problems with Shopify and their solutions

Shopify is a widely used e-commerce platform that makes it easier for businesses to sell their products online. The easy-to-use CMS made the platform particularly profitable for small retailers during the pandemic, allowing them to recover about 94% of the profits that could have simply been lost due to quarantine restrictions.

As with any new website, a new Shopify store will require a lot of effort on the part of its webmaster to provide the necessary visibility for users to find the site, let alone convert users to customers. And, as with any other CMS, there are several SEO hurdles that store owners need to eliminate in order for their website to effectively find its audience.

LIMITED URL STRUCTURE

Shopify CMS allows you to divide product lists into two main categories – products and collections, along with more general posts, pages and blogs. Creating a new product on Shopify allows you to list individual items that you have for sale, while collections give you the ability to combine your disparate products and sort them into categories that are easy to find.

The problem most people face is that Shopify also provides a pre-defined hierarchical structure with limited customization options. The /product and /collection subfolders must be included in the URL of every new product or collection you upload.

Even though this is a huge bone of contention among users, Shopify has not yet solved this problem, and there is currently no solution. As a result, you will need to be extremely careful with the URL label (the only part that can be customized). Make sure you use the right keywords in the title, and classify your posts intelligently so that your products are best found.

AUTOMATICALLY GENERATED REPEATING CONTENT

Another unpleasant problem with classification occurs when people add a particular product to a collection. This is because, although there is already an URL for the product page, linking the product to a collection automatically creates an additional URL for it in the same collection.

Shopify automatically treats the collection URL-address as canonical for internal links, rather than as a product URL-address, which can make the task much more difficult when it comes to ensuring that the correct pages are indexed.

However, in this case, Shopify allowed the fixes, although this is due to editing the code in the back-end of your store’s theme. Following these instructions, the collection pages of your Shopify site will only point internal links to the canonical / product / URLs.

NO REDIRECTION AT THE END OF THE SLASH

Another problem with duplicating Shopify content is related to the trailing slash at the end of the URL used to indicate the catalog. Google treats URLs with and without slashes as unique pages. By default, Shopify automatically terminates an URL without a slash, but variations of the same URL with a slash at the end are available to both users and search engines. This can usually be avoided by applying a trailing slash redirect to the entire site via the website’s htaccess file, but Shopify does not allow access to the htaccess file.

Instead, Shopify recommends that SEO specialists use canonical tags to tell Google which version of each page is preferred for indexing. This is the only fix available at the moment, but it is far from perfect and often leads to problems with data attribution in Google Analytics and other tracking programs.

NO CONTROL OVER THE FILE ROBOTS.TXT ON THE SITE

In addition to forcing users to create duplicate versions of pages against their will, Shopify also prevents webmasters from manually editing the file robots.txt of the store. Apparently, Shopify sees this as a privilege, solving unpleasant technical SEO issues on your behalf. However, when products run out or collections disappear, you can’t use either noindex or nofollow for the remaining redundant pages.

In this case, you can edit the theme of your store by adding robot meta tags to the <head> section of each corresponding page. Shopify has created a step-by-step guide on how to hide duplicate pages from the search here.

Complete website SEO audit using the screaming frog tool

COMPLETE WEBSITE SEO AUDIT USING THE SCREAMING FROG SEO AUDIT TOOL

Technical SEO audit of your website is one of the most important stages in SEO promotion of a website, which consists in finding errors on the resource and eliminating them.

After all, all the mistakes made in the website negatively affect its indexing and ranking in the Top-list of websites. Screaming Frog is an indispensable website audit software for every webmaster and SEO specialist. It is not intended for large websites and up to 50,000 URLs are free.

SCREAMING FROG GUIDE – BASIC FUNCTIONALITY AND INTERFACE OF THE TOOL

The same as with any other website audit tool, let’s first get acquainted with its interface in this brief manual.


To start an SEO audit using Screaming Frog, enter the site URL in the address field and click the “Start” button.

If you have a small website, the site crawl and generation of a website audit report will only take a couple of minutes.

As a result, we see the main window with areas divided into 4 parts:

  • window No. 1 shows a table with a list of all website pages;
  • window No. 2 shows the number of website pages and their percentage ratio;
  • window No. 3 shows detailed information about the specific page selected in window No. 1;
  • window No. 4 shows the website structure in the form of a diagram.

Let’s take a closer look at the audit checklist and functionality of this website audit tool and how it will help us analyze our website.

INTERNAL TAB

The Internal tab displays all internal pages, so you can view the following information here:

1. INDEXING OF PAGES

In the Indexability column, you can see which pages are available for indexing and which are closed from the Screaming Frog crawler.

It is very important that the main pages of services, catalog and products are available for indexing, and if not, then you need to understand the reasons and fix this defect.

2. PAGE RESPONSE CODES AND THEIR ANALYSIS

All pages should give the correct codes of the server response: useful pages (such as product categories, products, pages of services) should give a response 200, non-existing pages – give a response 404 (see below, they were excluded from the linking of a website), pages the address of which had been changed forever — a response code 301, pages the address of which had been changed temporarily (such as equities) — a response code 302.

You can see all this data in the Status Code column (where information about the server response code is displayed), and in the next Status column – the server code decryption (for example, for code 200 — the OK status, etc.).

The ideal situation is when 100% of the website pages return the server a response code 200, but in practice this is difficult to achieve. This will also help increase the site loading speed.

For example, let’s analyze the page https://uaateam.agency/about-us. As we can see, it has the status code 301, which means that it has changed its address forever.

We need to find out where it redirects the user now, so that it does not turn out that it links to a non-existent or inappropriate page. To do this, click on the line we need, and more detailed information will be displayed in the lower window.

Select the Outlinks tab, which contains information about which URLs this page links to, and see that it leads to the same page, only with a slash.

You can also do this much more conveniently in the Response Code tab, which displays information about response codes for internal and external links.

By selecting a filter, you can view and analyze pages with response code 301, response code 404 and so on individually. This option is suitable for very large websites, and if you have a lot of pages not showing a response code 200.

Attention! It is advisable to avoid having excessive redirects inside the website, as this significantly slows down the page loading speed and has a negative impact on the transfer of weight across pages.

This happens because when you open a specific page, you first spend time loading it, only then you are redirected to another page, which also takes some time, and only then the target page that is necessary for the user is loaded.

EXTERNAL TAB

Here you can see a list of all the resources that the analyzed website links to. For detailed information about which pages and websites your site is linked to, select the Inlinks tab, which is located at the bottom of the 3rd window.

3. CHECKING THE FILE ROBOTS.TXT

If a file robots.txt is added to the website, then it is necessary to check that there are no accidentally important pages that are closed from indexing.

In our case, there are only appropriate pages closed in robots.txt from the Screaming Frog crawler (such as filters and grouping of pages in the blog).

If you find important pages here, you will need to correct the file robots.txt, i.e. open hidden pages for search robots.

4. TITLE AND DESCRIPTION TAGS

You need to make sure that a unique Title and Description are generated for all pages, and they contain keywords that the user can easily find and get to the desired page.

General information on the number of Title (Page Title) and Description, how many of them are empty on the pages (Missing) and how many duplicate (Duplicate), and in what percentage — you can see in window No. 2.

To see more details on which pages these important meta tags are missing, go back to the first window.

On the Page Titles (Description) tab, you can view snippets for each page and select the necessary filter (Missing and Duplicate) to view the pages for which you will need to add or rewrite these meta tags.

SEO specialists optimize Title and Description as part of website audit service and website promotion.

5. H1 TAG

By analogy with the Title and Description meta tags, make sure that each page has a unique H1 tag that contains the name of the service, category, or product. This will help users better navigate the website, and Screaming Frog crawlers better rank it.

You also need to make sure that this tag is the only one on the page.

6. IMAGE OPTIMIZATION

Images is a tab that contains information about images.

<p”>The website loading speed directly depends on the size of the images. Therefore, large images, namely more than 100 KB, slow it down very much. Therefore, we recommend that you do not use this type of images.</p”>

Also, you need to check that the images of services and products have Alt and Title filled in. This will help you rank better in the image search.

7. CHECKING THE REL=”CANONICAL” ATTRIBUTE

To deal with duplicate content, you must specify the Rel=”canonical” attribute between the <head></head> tags for all categories of products or services. Thanks to this, search robots will start to consider it a higher priority.

8. SITEMAP.XML WEBSITE MAP ANALYSIS

If the website has a file sitemap.xml, it is recommended to check whether pages with redirects 301, errors 404 and duplicates are included in it by mistake.

You can usually crawl a sitemap using Screaming Frog at:

[name of website]/sitemap.xml.

To carry out website auditing to identify SEO problems with the help of the tool, you need to change the Mode-List mode.

And then choose the download option:

CONCLUSION

In this article we have reviewed the SEO website technical audit fundamentals that need to be checked during the audit using Screaming Frog SEO Spider.

Such mini-audits are also recommended to be performed periodically to quickly identify and correct errors in the website.

If you have any difficulties or questions about conducting a SEO audit of your website, you can always contact our professional SEO specialists from UAATeam, who will be happy to help you.

Open->
to new

Start working with #UAATEAM

Select a Service: